

Rain Gardens That Work Begin With Good Planning
Rain gardens are one of the most effective ways homeowners can reduce stormwater runoff, improve water quality, and create habitat for birds and pollinators. But a successful rain garden is much more than a hole in the ground filled with flowers.
The best rain gardens are carefully planned. They capture runoff where it naturally flows, allow water to soak into the soil within a day or two, and use plants that thrive under changing moisture conditions.
Whether you’re building a small garden beside a downspout or creating a larger landscape feature, a little planning before you dig will save time, money, and frustration later.
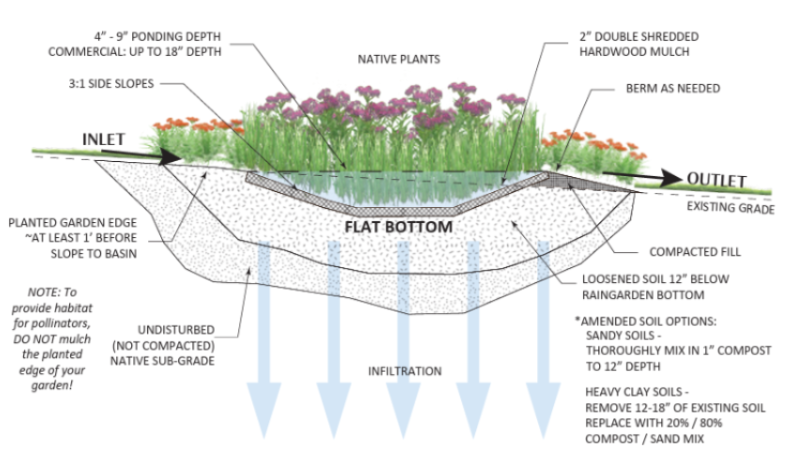
Before You Start Digging
A rain garden is not just a landscaped depression. It’s a place where water slows down, spreads out, and soaks into the ground instead of rushing into the storm drain system.
Every successful rain garden does three things:
- Captures runoff where it naturally flows
- Lets water soak into soil within 24–48 hours
- Uses plants that can handle both wet and dry conditions
The steps below are how to build that system in your yard.
Step 1: Watch the Next Rainstorm
Before choosing a location, spend a few minutes outside during the next moderate rain.
Instead of asking, “Where do I want a rain garden?” ask, “Where is the water already trying to go?”
Watch for:
-
- Roof downspouts that discharge onto the lawn
- Areas where water naturally collects
- Water flowing across driveways or sidewalks
- Places where runoff enters the street
- Areas that remain dry because water bypasses them completely
Pay attention to how long water remains after the storm.
A good rain garden should temporarily store water after a rainfall, but it should not remain ponded for several days.
This simple observation often tells you more than any map or landscape plan.
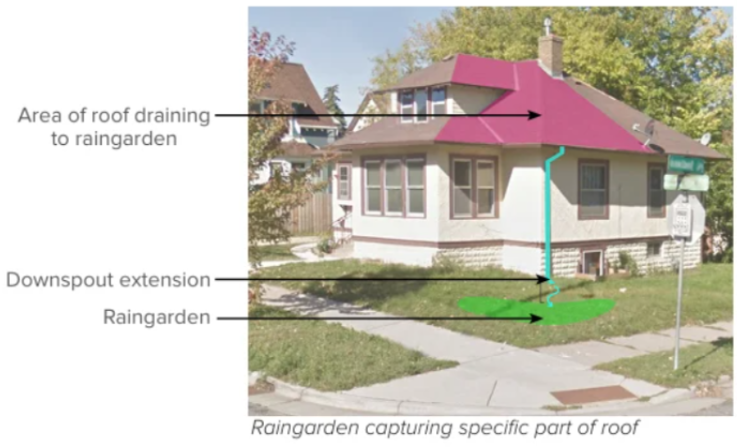
Step 2: Choose the Right Location
Not every low spot makes a good rain garden.
A successful rain garden should:
-
- Receive runoff naturally
- Be less than 300 sq ft in size
- Be at least 10 feet from building foundations
- Be at least 35 feet away from septic systems
- Be at least 20 feet away from a drinking water well – 150 feet if you anticipate using fertilizers/pesticides
- Avoid underground utilities
- Avoid large tree roots whenever possible
- Have room for overflow during larger storms
Don’t put your rain garden in an area that is already permanently wet. Those areas often indicate shallow groundwater or poor drainage that a rain garden alone cannot solve.
If you plan to direct roof runoff into the garden, make sure overflow can continue safely away from your home during very large storms.
Lay out a hose or spray paint in the desired shape to use a guide for placement and digging.
Step 3: Get to Know Your Soil
Healthy soil is the engine that makes a rain garden work.
Different soils absorb water at different rates.
Sandy soils drain quickly.
Clay soils drain much more slowly.
Most Nebraska soils fall somewhere between those extremes.
Before digging, perform a simple infiltration test.
Once you know how fast your soil drains, you can estimate how deep water can safely pond—and use that depth in the sizing formula below.
Infiltration Test
Fill the hole with water and let it sit for an hour or two to pre-wet the soils for your test. Then refill the hole with water and push a popsicle stick into the side of the hole to mark the water level.
After an hour, measure and record the depth of the water again. You may want to continue taking measurements at hourly increments for a few more hours.
If the water level dropped one-half inch or more; this is a perfect site for a rain garden but you might still want to consider soil amendments (like peat moss).
If the water level dropped less than one-quarter of an inch; you will have to amend your soils or try another site.
Step 4: Know Where the Groundwater Is
In Nebraska, groundwater levels vary considerably from one neighborhood to another.
A rain garden should encourage infiltration into the soil—not become a permanent pond connected to groundwater.
If you encounter groundwater while digging, or if water regularly stands in the excavation before rainstorms, the site may not be appropriate without redesign.
Maintaining separation between the bottom of the rain garden and the seasonal high groundwater table allows the soil to naturally filter stormwater before it reaches groundwater.
Step 5: Size the Rain Garden
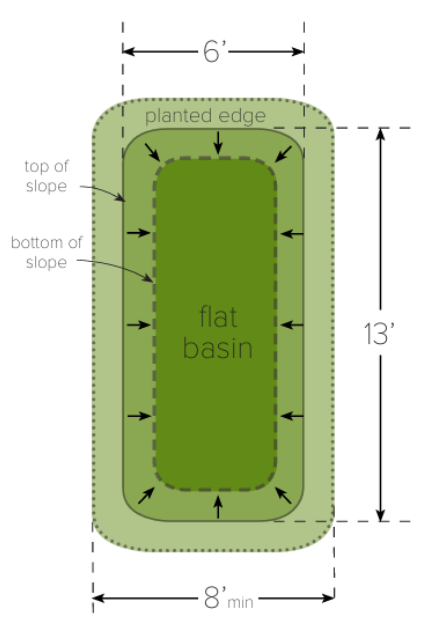
Bigger isn’t always better. Residential rain gardens should be no larger than 300 sq ft.
The size of a rain garden depends on:
-
- The drainage area feeding it
- Soil infiltration rate
- Available yard space
- Desired appearance
- Access for weeding and maintenance
A small garden may collect runoff from a single downspout.
Larger gardens may capture runoff from multiple roof sections or portions of a driveway.
The depth of the rain garden depends on your soil infiltration test.
1 hour measurement (inches) x 24 hours = Amount of water your soil can infiltrate
Example: 1/4″ per hour x 24 hours = 6″ deep rain garden.
This is the maximum depth of your rain garden.
In most residential settings, rain gardens are only 4 to 8 inches deep.
Shallow gardens are safer, easier to maintain, and blend more naturally into the landscape.
A / D = Garden Size
A = Area of your property draining to the rain garden, measured in square feet (length x width)
D = Depth of the rain garden in inches (from your infiltration test)
(This equation is for a 1-inch / 24-hr rain event)
Example:
A 450 square foot driveway drains to your rain garden.
If your design depth is 6 inches:
450 sq ft / 6 inches = 75 square feet of rain garden
Step 6: Dig Carefully
Call Nebraska 811 at 800-331-5666 or submit a ticket. You’ll need to allow them 5 business days to respond.
Once all of the utilities have been marked, it is now safe to start digging.
Remove existing turf before excavation. Turf can be rolled up and reused, composted, or given away.
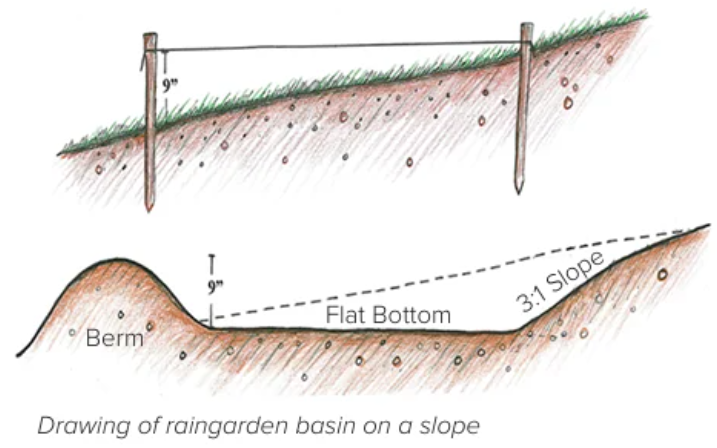
One of the most important construction steps is creating a level bottom.
Although the surrounding ground may slope, the bottom of the rain garden should be nearly flat.
A level bottom allows water to spread evenly across the garden instead of concentrating in one deep area.
To build the downhill berm to help retain runoff, use excavated soil or flip over sod rolls.
Gentle side slopes make the garden easier to mow around and easier to maintain – these can be created by flipping over the sod on the side slope areas.
Step 7: Build Healthy Soil
Many rain gardens benefit from improving the existing soil.
A typical rain garden soil contains:
-
- Existing native soil
- Compost to improve organic matter
- Sand when additional drainage is needed
The goal is to create soil that drains well while still holding enough moisture for plants.
Avoid filling the garden entirely with compost – a little bit goes a long way. A 1″ layer mixed thoroughly to 12″ deep is enough compost for native plants.
Too much organic matter can hold excessive moisture, settle over time, and release nutrients into runoff.
Step 8: Do You Need an Underdrain?
Most residential rain gardens do not require an underdrain.
However, underdrains can be useful when:
-
- Native soils drain very slowly
- Space is limited
- Local groundwater conditions restrict infiltration
- Engineers require additional drainage capacity
An underdrain typically consists of a perforated pipe surrounded by clean stone beneath the planting soil.
The pipe collects excess water after the soil has had time to filter it and conveys it safely to another outlet.
If an underdrain is installed, include a cleanout so it can be inspected and maintained in the future.
Step 9: Plan for Overflow
Every rain garden eventually fills.
Large storms will exceed its storage capacity.
Plan where overflow water will go before you ever plant the first flower.
Overflow should discharge safely away from buildings without causing erosion.
A simple rock-lined spillway or stabilized low point often provides all that’s needed.
Ensure your overflow is lower than the top of the inlet.
Overflow is a sign the rain garden is working—it means it successfully captured the first portion of the storm before safely passing along the remainder.
Step 10: Choose Plants for the Right Moisture Zone
Not every plant experiences the same conditions inside a rain garden.
The center stays wet longest.
The sides drain more quickly.
The berm may rarely become saturated.
Thinking in zones helps plants thrive.
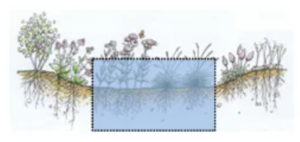
Wet Center
These plants tolerate periodic standing water.
Examples include:
-
- Joe-pye Plant
- False Blue Indigo
- Fox Sedge
- Swamp Milkweed
- False Sunflower
 Middle Slopes
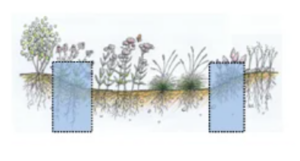 Middle Slopes
These areas alternate between wet and dry.
Good choices include:
-
- Black-eyed Susan
- Purple Coneflower
- Prairie Blazing Star
- New England Aster
- Wild Bergamot
Upper Edge and Berm
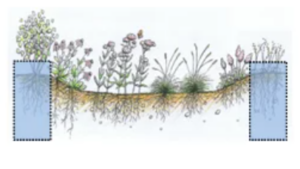 Upper Edge and Berm
These plants prefer drier soils.
Examples include:
-
- Little Bluestem
- Prairie Dropseed
- Butterfly Milkweed
- Leadplant
- Prairie Smoke
Using native species helps support pollinators while reducing long-term maintenance.
For more information plants, review the following Nebraska resources:
University of Nebraska NebGuide – Plant Selection for Rain Gardens in Nebraska
Planting and Finishing Your Garden
As much as possible, do not step in your garden.
Check one last time with a 4′ level to make sure the basin is flat.
It is often easier to apply mulch before you plant. This also reduces the soil compaction during planting.
To help guide your planting, place your plants in the garden bed where you want to plant them. This helps provide a view of the finished product and will direct your digging.
With each plant, remember to break apart the root ball and plant them deep enough that the roots are in soil, not just in the mulch layer.
Water. New plants need about 1″ of water per week while they get established.
The First Five Years
Even well-built rain gardens go through an adjustment period. The first year is the hardest. Plants are still establishing roots, soil is settling, and weeds often appear faster than native plants.
That’s normal. Rain gardens improve over time.

Year 1
Inspect your garden once a month to make sure it is functioning properly.
Expect frequent watering during dry periods – 1″ per week.
Weeds often appear before native plants become established.
Mulch helps conserve moisture and suppress weeds. Ensure mulch and soil aren’t washing out of the garden.
Remove trash as necessary.

Year 2
Plants begin spreading.
Remove last year’s dead growth and any leaves from the winter.
Replace any species that struggled.
Continue removing invasive weeds.
Remove trash as necessary.

Year 3
The garden becomes noticeably fuller.
Watering is needed less often.
Roots improve infiltration.

Years 4–5
Maintenance shifts from establishment to stewardship.
Divide overcrowded plants if needed.
Refresh mulch where necessary.
Inspect the overflow area after major storms.
Remove accumulated sediment near inflow points.
A mature rain garden often requires no more maintenance than a traditional landscape bed.
Common Mistakes
Avoid these common problems:
-
- Digging too deep
- Installing the garden too close to the house
- Choosing an area that already stays wet
- Forgetting to plan an overflow route
- Planting species that cannot tolerate changing moisture conditions
- Assuming a rain garden never needs maintenance
- Ignoring weeds during the first two growing seasons
Rain Garden Do's and Don'ts
Do
-
- Watch several rainstorms before choosing a location.
- Test your soil before designing the garden.
- Build a level bottom.
- Use native plants suited to each moisture zone.
- Plan for overflow.
- Weed regularly during establishment.
Don’t
-
- Place a rain garden directly against your foundation.
- Dig into groundwater.
- Create steep side slopes.
- Expect every storm to stay within the garden.
- Overwater once plants are established.
- Give up during the first year—rain gardens become more attractive and effective with time.
Why It Matters
A rain garden doesn’t solve flooding on its own.
But it changes how water moves through a neighborhood—slowing it down, spreading it out, and keeping more of it out of the storm drain system.
Multiply that across a community, and the impact becomes measurable.
Our Water. Our Responsibility.